Since you are searching for this query “async javascript plugin settings” so I assume that you are seeking for proper configure of async javascript plugin. Honestly, every WordPress performance plugin requires proper configuration to get the best performance output.
Slight misconfiguration can lead to increased loading time or slow page loading speed. If not there is a possibility of bad impacts such as increased server load, broken javascript, etc.
Async Javascript Plugin is an extension of the “Autoptimize” caching plugin, developed by Frank Goossens. You will definitely see the same author-name below both of these two plugins. This plugin applies the “Async & Defer” attribute to the website javascript and thus controls the loading of javascript files to boost site loading performance.
So before you go ahead and install “async javascript plugin”, make sure you have activated the parent plugin (Autoptimize). You can read my autoptimize plugin configuration guide here.
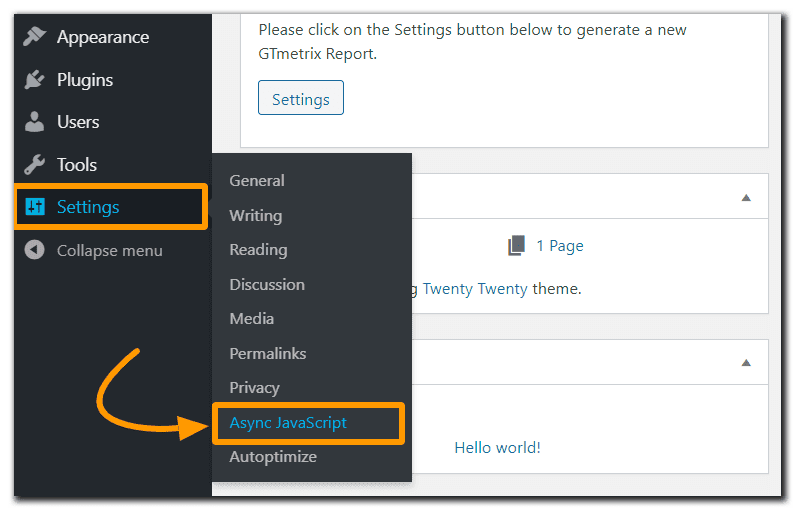
Now you can head to the plugin settings for configuration. There is another alternative way to find the plugin settings from the Autoptimize plugin as well.
To find the plugin settings check the image below.

By default, you will arrive at the setting page of the plugin but it’s not recommended to configure it yourself. The same plugin configuration can not be applied to every website because the performance depends on the server speed, theme scripts, site load, and many other experts.
Step 1 – Combine The Plugin With GTmetrix
Just to avoid any possible performance drop or site break it’s very importent to rely on a professional tool like GTmetrix that can help the plugin to determine the best async javascript plugin settings.
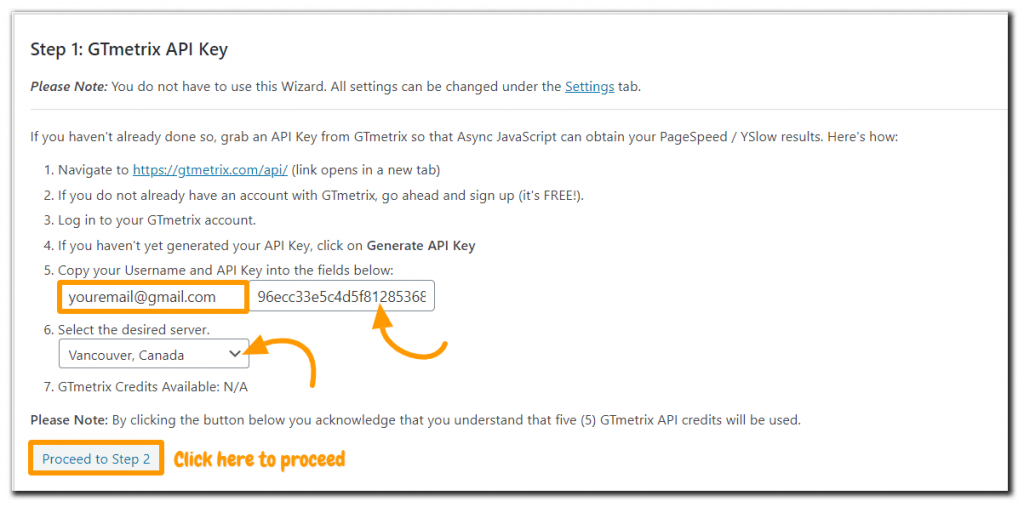
So, first of all, you will need to switch to the Wizard tab from the settings tab.

You will see this message at the top “Please Note: You do not have to use this Wizard. All settings can be changed under the settings tab“, but you should not go for settings if you are not familiar with it and have no idea what it actually does.
In the wizard, all you need to do is add the GTmetrix username and API key and test your site. The plugin will request GTmetrix for 5 different tests where the plugin will try five different configurations to determine which one is the best match for your site.
If you do not have an account on GTmetrix, create one because it’s free and very useful for your site.


Step 2 – Performing The Tests

Step 3 – Results & Recommendation
After the test, you will get a message “Async JavaScript has finished testing your site with the most common configuration options”. Based on these results the plugin will identify and instruct you apply the most recommended configuration in async javascript plugin settings.

In the 4th step, the plugin will automatically the best setting after getting confirmation from you. As mentioned in the recommendation part always check your site functionality after applying any of these configurations just to make sure everything is working perfectly.
Step 4 – Manual Async Javascript Plugin Settings
In any case, the plugin is unable to apply the setting you can switch to the settings tab and select the recommended option manually.

There are some more advanced options such as where you can force the plugin to async, defer or exclude a script by mentioning them inside the settings tab (specific textbox available for each of the command).
Moreover, even if the plugin settings conflict with your theme script you can simply fix this issue by excluding the theme from async javascript plugin settings.
Wrapping Up:
This plugin is one of my favorite and is one of the best performance plugin extensions available for WordPress site. Though the plugin settings seem very easy the “test & verify” method is more fruitful than the manual approach.
Either way, it helps to improve your site’s performance and should be used with the Autoptimize plugin for sure.
Need help with getting stuff done? Try Fiverr! You can find content writers for your website at a reasonable rate.
